How To Install Osticket On Centos 7 Network
How to Install & Configure OsTicket on Centos/RHEL 6x Q. What is OSTicket?- OSTicket is a widely-used and trusted open source support Ticket System. It seamlessly routes inquiries created via email, web-forms and phone calls into a simple, easy-to-use, multi-user.
In this article, we'll learn how to setup help desk ticketing system with osTicket in our machine or server running Fedora 22 or CentOS 7 as operating system. osTicket is a free and open source popular customer support ticketing system developed and maintained by Enhancesoft and its contributors. osTicket is the best solution for help and support ticketing system and management for better communication and support assistance with clients and customers. It has the ability to easily integrate with inquiries created via email, phone and web based forms into a beautiful multi-user web interface. osTicket makes us easy to manage, organize and log all our support requests and responses in one single place. It is a simple, lightweight, reliable, open source, web-based and easy to setup and use help desk ticketing system.
Here are some easy steps on how we can setup Help Desk ticketing system with osTicket in Fedora 22 or CentOS 7 operating system.
1) Installing LAMP stack
First of all, we'll need to install LAMP Stack to make osTicket working. LAMP stack is the combination of Apache web server, MySQL or MariaDB database system and PHP. To install a complete suit of LAMP stack that we need for the installation of osTicket, we'll need to run the following commands in a shell or a terminal.
On Fedora 22
LAMP stack is available on the official repository of Fedora 22. As the default package manager of Fedora 22 is the latest DNF package manager, we'll need to run the following command.
$ sudo dnf install httpd mariadb mariadb-server php php-mysql php-fpm php-cli php-xml php-common php-gd php-imap php-mbstring wget
On CentOS 7
As there is LAMP stack available on the official repository of CentOS 7, we'll gonna install it using yum package manager.
$ sudo yum install httpd mariadb mariadb-server php php-mysql php-fpm php-cli php-xml php-common php-gd php-imap php-mbstring wget
2) Starting Apache Web Server and MariaDB
Next, we'll gonna start MariaDB server and Apache Web Server to get started.
$ sudo systemctl start mariadb httpd
Then, we'll gonna enable them to start on every boot of the system.
$ sudo systemctl enable mariadb httpd
Created symlink from /etc/systemd/system/multi-user.target.wants/mariadb.service to /usr/lib/systemd/system/mariadb.service.
Created symlink from /etc/systemd/system/multi-user.target.wants/httpd.service to /usr/lib/systemd/system/httpd.service.
3) Downloading osTicket package
Next, we'll gonna download the latest release of osTicket ie version 1.9.9 . We can download it from the official download page http://osticket.com/download or from the official github repository. https://github.com/osTicket/osTicket-1.8/releases . Here, in this tutorial we'll download the tarball of the latest release of osTicket from the github release page using wget command.
$ cd /tmp/
$ wget https://github.com/osTicket/osTicket-1.8/releases/download/v1.9.9/osTicket-v1.9.9-1-gbe2f138.zip
--2015-07-16 09:14:23-- https://github.com/osTicket/osTicket-1.8/releases/download/v1.9.9/osTicket-v1.9.9-1-gbe2f138.zip
Resolving github.com (github.com).. 192.30.252.131
..
Connecting to s3.amazonaws.com (s3.amazonaws.com) 54.231.244.4 :443.. connected.
HTTP request sent, awaiting response.. 200 OK
Length: 7150871 (6.8M) [application/octet-stream] Saving to: ‘osTicket-v1.9.9-1-gbe2f138.zip’
osTicket-v1.9.9-1-gb 100%[>] 6.82M 1.25MB/s in 12s
2015-07-16 09:14:37 (604 KB/s) - ‘osTicket-v1.9.9-1-gbe2f138.zip’ saved [7150871/7150871] Ben 10 protector of earth games.
4) Extracting the osTicket
After we have successfully downloaded the osTicket zipped package, we'll now gonna extract the zip. As the default root directory of Apache web server is /var/www/html/ , we'll gonna create a directory called 'support' where we'll extract the whole directory and files of the compressed zip file. To do so, we'll need to run the following commands in a terminal or a shell.
$ unzip osTicket-v1.9.9-1-gbe2f138.zip
Then, we'll move the whole extracted files to it.
$ sudo mv /tmp/upload /var/www/html/support
5) Fixing Ownership and Permission
Now, we'll gonna assign the ownership of the directories and files under /var/ww/html/support to apache to enable writable access to the apache process owner. To do so, we'll need to run the following command.
$ sudo chown apache: -R /var/www/html/support
Then, we'll also need to copy a sample configuration file to its default configuration file. To do so, we'll need to run the below command.
$ cd /var/www/html/support/
$ sudo cp include/ost-sampleconfig.php include/ost-config.php
$ sudo chmod 0666 include/ost-config.php
If you have SELinux enabled on the system, run the following command.
$ sudo chcon -R -t httpd_sys_content_t /var/www/html/support
$ sudo chcon -R -t httpd_sys_rw_content_t /var/www/html/support
6) Configuring MariaDB
As this is the first time we're going to configure MariaDB, we'll need to create a password for the root user of mariadb so that we can use it to login and create the database for our osTicket installation. To do so, we'll need to run the following command in a terminal or a shell.
$ sudo mysql_secure_installation
..
Enter current password for root (enter for none):
OK, successfully used password, moving on..
Setting the root password ensures that nobody can log into the MariaDB
root user without the proper authorisation.
Set root password? [Y/n] y
New password:
Re-enter new password:
Password updated successfully!
Reloading privilege tables.
Success!
..
All done! If you've completed all of the above steps, your MariaDB
installation should now be secure.
Thanks for using MariaDB!
Note: Above, we are asked to enter the root password of the mariadb server but as we are setting for the first time and no password has been set yet, we'll simply hit enter while asking the current mariadb root password. Then, we'll need to enter twice the new password we wanna set. Then, we can simply hit enter in every argument in order to set default configurations.
7) Creating osTicket Database
As osTicket needs a database system to store its data and information, we'll be configuring MariaDB for osTicket. So, we'll need to first login into the mariadb command environment. To do so, we'll need to run the following command.
$ sudo mysql -u root -p
Now, we'll gonna create a new database 'osticket_db' with user 'osticket_user' and password 'osticket_password' which will be granted access to the database. To do so, we'll need to run the following commands inside the MariaDB command environment.
> CREATE DATABASE osticket_db;
> CREATE USER 'osticket_user'@'localhost' IDENTIFIED BY 'osticket_password';
> GRANT ALL PRIVILEGES on osticket_db.* TO 'osticket_user'@'localhost' ;
> FLUSH PRIVILEGES;
> EXIT;
Note: It is strictly recommended to replace the database name, user and password as your desire for security issue.
8) Allowing Firewall
If we are running a firewall program, we'll need to configure our firewall to allow port 80 so that the Apache web server's default port will be accessible externally. This will allow us to navigate our web browser to osTicket's web interface with the default http port 80. To do so, we'll need to run the following command.
$ sudo firewall-cmd --zone=public --add-port=80/tcp --permanent
After done, we'll need to reload our firewall service.
$ sudo firewall-cmd --reload
9) Web based Installation
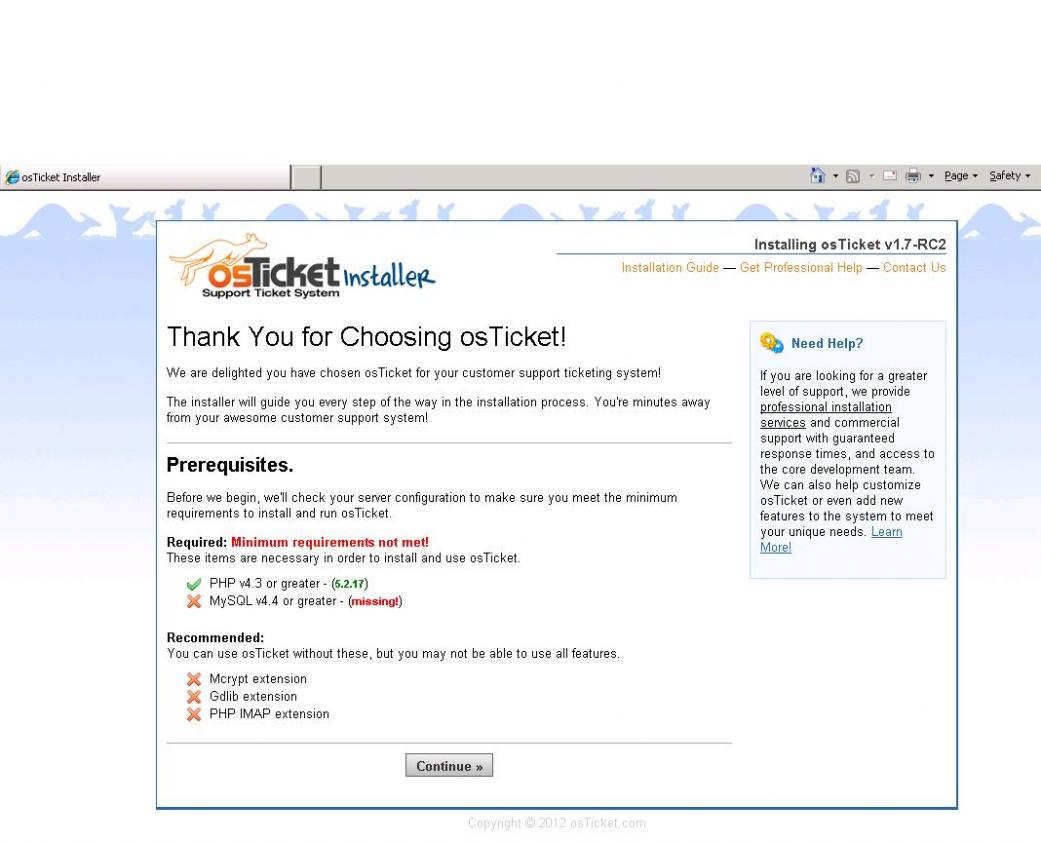
Finally, is everything is done as described above, we'll now should be able to navigate osTicket's Installer by pointing our web browser to http://domain.com/support or http://ip-address/support . Now, we'll be shown if the dependencies required by osTicket are installed or not. As we've already installed all the necessary packages, we'll be welcomed with green colored tick to proceed forward.
After that, we'll be required to enter the details for our osTicket instance as shown below. We'll need to enter the database name, username, password and hostname and other important account information that we'll require while logging into the admin panel.
After the installation has been completed successfully, we'll be welcomed by a Congratulations screen. There we can see two links, one for our Admin Panel and the other for the support center as the homepage of the osTicket Support Help Desk.
If we click on http://ip-address/support or http://domain.com/support, we'll be redirected to the osTicket support page which is as shown below.
Next, to login into the admin panel, we'll need to navigate our web browser to http://ip-address/support/scp or http://domain.com/support/scp . Then, we'll need to enter the login details we had just created above while configuring the database and other information in the web installer. After successful login, we'll be able to access our dashboard and other admin sections.
10) Post Installation
After we have finished the web installation of osTicket, we'll now need to secure some of our configuration files. To do so, we'll need to run the following command.
$ sudo rm -rf /var/www/html/support/setup/
$ sudo chmod 644 /var/www/html/support/include/ost-config.php
Conclusion
osTicket is an awesome help desk ticketing system providing several new features. It supports rich text or HTML emails, ticket filters, agent collision avoidance, auto-responder and many more features. The user interface of osTicket is very beautiful with easy to use control panel. It is a complete set of tools required for a help and support ticketing system. It is the best solution for providing customers a better way to communicate with the support team. It helps a company to make their customers happy with them regarding the support and help desk. If you have any questions, suggestions, feedback please write them in the comment box below so that we can improve or update our contents. Thank you ! Enjoy :-)
CentOS is an open-source Linux distribution based on Red Hat Enterprise Linux (RHEL). CentOS 7 is viewed as the preferred option for web hosting due to its stability and active developer community.
In this tutorial, learn how to install CentOS 7 in a few simple steps.
- Recommended minimum of 10GB of free disk space
- CentOS 7 ISO install file
If you are only looking to update or upgrade CentOS, see How to Upgrade or Update CentOS.
To download the official and up-to-date CentOS 7 ISO file, navigate to https://www.centos.org/download/.
Our recommendation for non-enterprise environments is to download the DVD ISO option, which includes the GUI.
Note: We recommend the Minimal ISO option only for production enterprise environments.
Step 2: Create Bootable USB or DVD
Now that you have downloaded the ISO image, you can create a bootable USB, burn it on a DVD or load the image on a VM.
Several applications can help you create a bootable USB. We recommend using Etcher. Download the application for your system (Windows, macOS or Linux), install and run.
The setup is intuitive and easy:
- Select the CentOS 7 ISO image.
- Insert the USB flash.
- Find the USB and select it in the Select drive step.
- Click Flash.
Upon booting the CentOS 7 ISO file, you can begin the installation process. To do so, select Install CentOS 7. That will start the installer’s graphical interface.
If you are booting from a USB, click the Install to Hard Drive icon on the desktop. That will open the installation wizard.
Before starting the installation process itself, select which language you would like to use during installation. The default option is English.
Click Continue to confirm your selection.
There are a couple of settings you would want to configure. All items marked with a warning icon must be configured before you begin the installation.
Some system configurations outlined below may differ based on use case.
To set a date and time for the system, click the Date & Time icon under the Localization heading. Select a region/time zone on the map of the world as seen below. Once you have selected your time zone, hit Done to save your changes.
Select the Keyboard option under the Localization heading to set the keyboard layout.
The system default is English (US) and the language you selected in the initial window. Click the plus icon to add more layouts. Move a layout to the top of the list to make it the default option.
Click the Options button to define a key combination for switching between keyboard layouts. When you are satisfied with the settings defined, select the Done button to confirm the changes.

Next, select the Language Support option under the Localization heading. The language selected in the Welcome to CentOS 7 window will be the default system language. If necessary, select additional languages and hit the Done button once you are finished.
Select the Software Selection option under the Software heading. You will see a list of predefined Base Environment options and optional add-ons. This part entirely depends on your needs.
- Minimal Install. This is the most flexible and least resource-demanding option. Excellent for production environment servers. Be prepared to customize the environment.
- Predefined Server Options. If you are 100% certain about the role of your server and don’t want to customize it for its role, select one of the predefined server environments.
- GNOME Desktop and KDE Plasma Workspaces. These environments include a full graphical user interface.
When you have selected the base environment and optional add-ons, click the Done button. Wait for the system to check for software dependencies before you move on to the next option.
Click the Installation Destination option under the System heading. Check your machine’s storage under the Local Standard Disks heading. CentOS 7 will be installed on the selected disk.
Option 1: Automatic Partitioning
Under the Other Storage Options heading, select the Automatically configure partitioning checkbox. This ensures the selected destination storage disk will automatically partition with the /(root), /home and swap partitions. It will automatically create an LVM logical volume in the XFS file system.
If you do not have enough free space, you can reclaim disk space and instruct the system to delete files.
When finished, click the Done button.
Option 2: Manual Partitioning
Select the I will configure partitioning checkbox and choose Done.
If you want to use other file systems (such as ext4 and vfat) and a non-LVM partitioning scheme, such as btrfs. This will initiate a configuration pop-up where you can set up your partitioning manually.
This is an advanced setting option, very much based on your requirements.
KDUMP is enabled by default.
To disable the KDUMP kernel crash dumping mechanism, select the KDUMP option under the System heading and uncheck the Enable kdump checkbox. Click the Done button to confirm your changes.
La Guitarra Misteriosa In English Translation Average ratng: 5,0/5 8436 votes Okay so my spanish class is reading this book called 'la guitarra misteriosa', and its entirely in spanish. We just finished it and the test is sometime next week. Study 13 La Guitarra Misteriosa flashcards from Annie S. On StudyBlue. GUITARRA (Spanish to English translation). Free Download Rise Of Nations 3 Full Version. Translate GUITARRA to Spanish online and download now our free translation software to use at any time. If anyone knows how to find one, please please please help meee. La guitarra misteriosa in english translation. La Guitarra Misteriosa In English Translation. Best Answer: Steve and Jennie, two American teenagers, encounter unexpected experiences and adventures during their year in Mexico and vacation in Spain. These stories captivate the interest of beginning Spanish students with mystery and intrigue, while cultural highlights, interspersed throughout.
Note: KDUMP captures system information at the time of a crash. It helps you diagnose the cause of the crash. When enabled, kdump reserves a portion of system memory.
Network and Hostname
Click the Network & Host Name option under the System heading.
For the hostname, type in the fully qualified domain name of your system. In our example, we will set the Hostname as my_server.phoenixnap.com, where my_server is the hostname while phoenixnap.com is the domain.
Select Configure… and select to add IPv4 settings or IPv6 settings depending on what you have. Add static IP addresses to help identify your computer on the network. Bear in mind that your network environment’s settings define these values.
To add a static IP address:
- Select Manual from the Method drop-down.
- Click the Add button to add a static IP address.
- Enter the information for your network domain.
- IP Address
- Netmask Address
- Gateway Address
- DNS Servers Address
- Click Save to confirm your changes.
By default, all detected Ethernet connections are disabled. Click the ON/OFF toggle to enable the connection. After the installation of CentOS, follow our guide to learn more details about configuring your network settings.
Select the Security Policy option under the System heading. Choose a profile from the list and hit Select profile. Hit the Done button to confirm your selection.
Once everything is set up according to your liking, hit Begin Installation to start the install. This will start the initial installation process.
To define the root user, select the Root Password icon.
Select a Root Password and re-enter it in Confirm field.
Root user accounts should consist of at least 12 characters, including uppercase and lowercase letters, numbers, and special characters. We cannot stress enough the importance of a well-defined root password.
Click the Done button to proceed.
To begin, select the User Creation option.
Add a new system account user by defining the full name, user name, and password. We recommend you check the Make this user administrator and Require a password to use this account checkboxes. This will grant the user root privileges.
After you fill in all of the fields and define a secure password, select Done in the upper-left corner of the screen.
Wait for the installation process to complete.
Before you start using your new CentOS installation, reboot the system. Click the Reboot button.
Log into the system by using the credentials you defined previously.
This tutorial outlined how to install CentOS 7. By following this guide, you should have a successful installation and boot right into the system.
Next, You Should Also Read: